DIY: How to remove & replace your headlights.
#1
I recently changed my factory lights to HID Xenon Super White (Legal of course, since they are white).
Below you will find detailed instructions on how to complete this job.
I as well needed tips on how to do this so I stumbled agains't this article on the web: http://www.jrin.net/2007_09_18/howto-civic-headlights-removal
PICTURES ARE FROM http://www.jrin.net/2007_09_18/howto-civic-headlights-removal SOURCE. MY CAR WAS A 1995 CIVIC SI COUPE. BUT IT WAS QUITE THE SAME SINCE HONDAS ARE MADE ALMOST THE SAME.
WE WILL BE COVERING:
1. Bumper removal
2. Remove old bulb/headlights
_________________________
NOTE: For my car, I had to actually remove the bumper and remove the entire headlight kit in order to change the bulbs. This is because my engine bay is not big enough for me to stick my hand directly and change the bulb from the back. Some cars will not require the "Bumper Removal Step". But if you don't have room, follow it.
Step 1: Front Bumper Removal
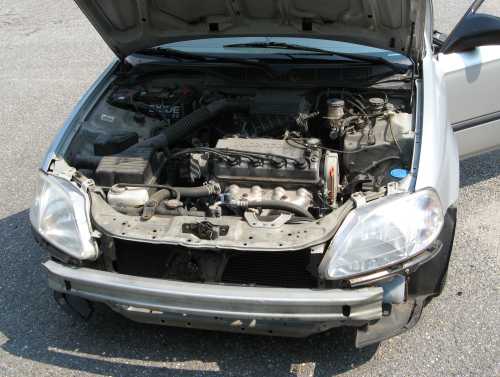
Time to complete:
< 20 minutes
Tools needed:
10mm socket wrench
#1-#3 phillips screw drivers (big and small)
DIY GUIDE:
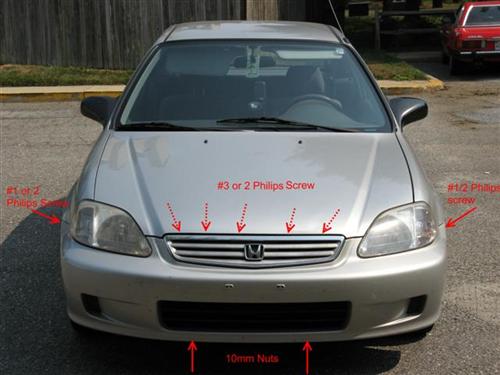
Here’s an overview of the screws you’ll be removing — 5 on the grill, one in each wheel well, and then two bolts on the under side.
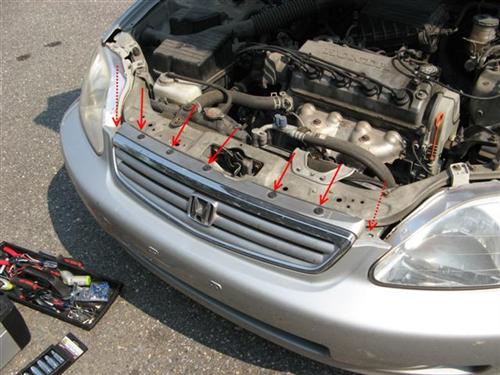
You’ll want to first remove these 5 screws.
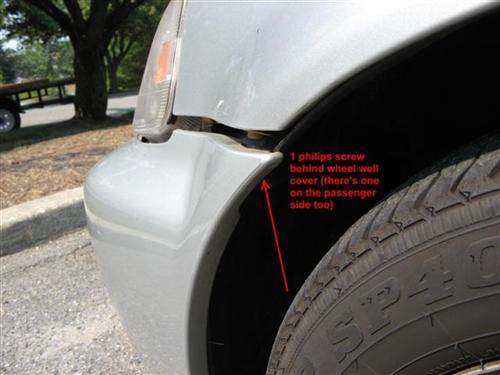
In each wheel well, right at the corner where the bumper meets the fender, there should be a screw holding them together. You’ll have to peel/pull back the wheel well plastic a bit to get at the screw.
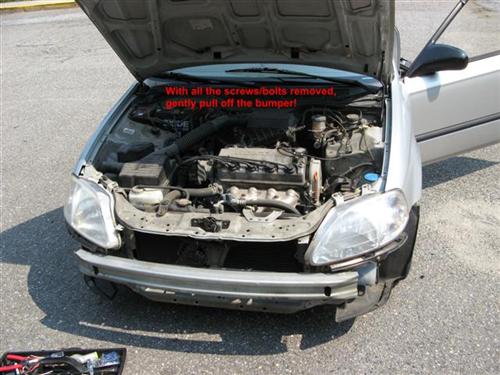
The bumper should now be free to be removed. Carefully start pulling the bumper straight away from the car — you may need to help the sides near the headlights/fender as they tend to get caught up on something whenever I pull mine off, but it’s nothing you can just ‘wiggle’ to get free — viola! it’s off!
Step 2: Headlights
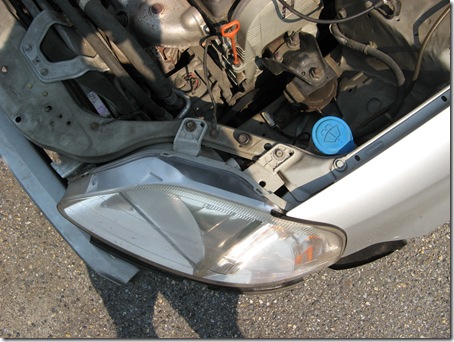
[B]Time to complete:
remove bumper = ~15 min
remove headlight = ~5 min
Tools needed:
10mm wrench / socket
DIY GUIDE:[B]
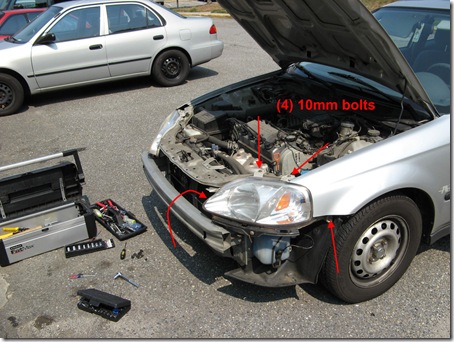
Taking out the headlights is quite simple.
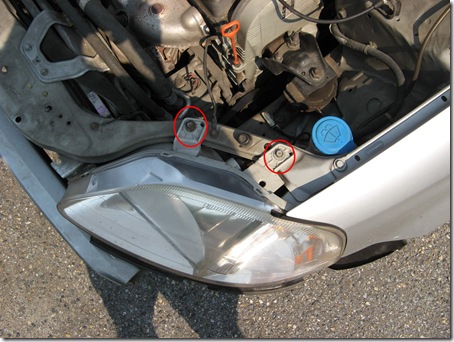
Then remove these two bolts. (Place them in a safe place. You wouldn't want to lose anything.) -For added protection against rust, if you want, soak them in WD-40 while your working on the headlights. This will help prevent rust on the bolts in the future.
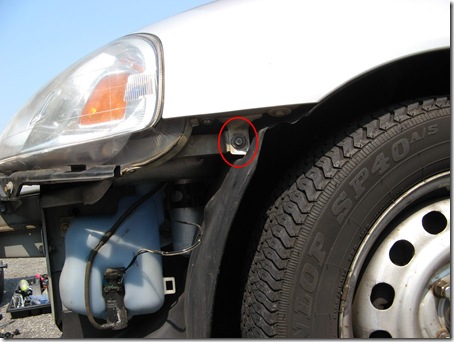
Now take out the bolt in the fender area….
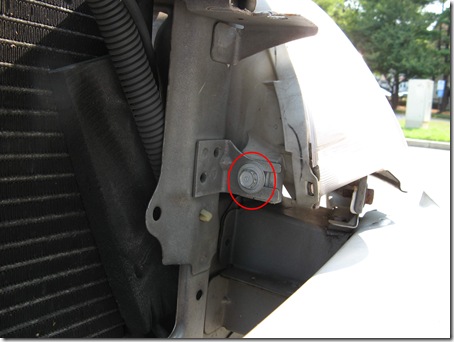
Then take out this bolt, and you are done! Pull it off slowly, carefull whith the wiring.
You should now be able to pull the headlight free. It is not a ’simple’ pull-the-headlight-out motion, rather you need to wriggle it around, tilt it, slide it, etc until you can find the right way to make it come out — but with these four bolts out, there is nothing holding it in there other than the wires connected to the bulbs (which should give you more than enough slack to pull it a little bit from the car)
Below you will find detailed instructions on how to complete this job.
I as well needed tips on how to do this so I stumbled agains't this article on the web: http://www.jrin.net/2007_09_18/howto-civic-headlights-removal
PICTURES ARE FROM http://www.jrin.net/2007_09_18/howto-civic-headlights-removal SOURCE. MY CAR WAS A 1995 CIVIC SI COUPE. BUT IT WAS QUITE THE SAME SINCE HONDAS ARE MADE ALMOST THE SAME.
WE WILL BE COVERING:
1. Bumper removal
2. Remove old bulb/headlights
_________________________
NOTE: For my car, I had to actually remove the bumper and remove the entire headlight kit in order to change the bulbs. This is because my engine bay is not big enough for me to stick my hand directly and change the bulb from the back. Some cars will not require the "Bumper Removal Step". But if you don't have room, follow it.
Step 1: Front Bumper Removal

Time to complete:
< 20 minutes
Tools needed:
10mm socket wrench
#1-#3 phillips screw drivers (big and small)
DIY GUIDE:

Here’s an overview of the screws you’ll be removing — 5 on the grill, one in each wheel well, and then two bolts on the under side.

You’ll want to first remove these 5 screws.

In each wheel well, right at the corner where the bumper meets the fender, there should be a screw holding them together. You’ll have to peel/pull back the wheel well plastic a bit to get at the screw.

The bumper should now be free to be removed. Carefully start pulling the bumper straight away from the car — you may need to help the sides near the headlights/fender as they tend to get caught up on something whenever I pull mine off, but it’s nothing you can just ‘wiggle’ to get free — viola! it’s off!
NOW LET'S MOVE ON TO THE HEADLIGHTS
Step 2: Headlights

[B]Time to complete:
remove bumper = ~15 min
remove headlight = ~5 min
Tools needed:
10mm wrench / socket
DIY GUIDE:[B]

Taking out the headlights is quite simple.

Then remove these two bolts. (Place them in a safe place. You wouldn't want to lose anything.) -For added protection against rust, if you want, soak them in WD-40 while your working on the headlights. This will help prevent rust on the bolts in the future.

Now take out the bolt in the fender area….

Then take out this bolt, and you are done! Pull it off slowly, carefull whith the wiring.
You should now be able to pull the headlight free. It is not a ’simple’ pull-the-headlight-out motion, rather you need to wriggle it around, tilt it, slide it, etc until you can find the right way to make it come out — but with these four bolts out, there is nothing holding it in there other than the wires connected to the bulbs (which should give you more than enough slack to pull it a little bit from the car)
HOPEFULLY THIS HAS HELPED. IF YOU HAVE ANY QUESTIONS, FEEL FREE TO ASK.
Thread
Thread Starter
Forum
Replies
Last Post
Hendersauce
Honda Mailing List
24
09-27-2006 09:21 AM
Hendersauce
Honda Mailing List
0
09-21-2006 02:51 PM
Hendersauce
Honda Mailing List
0
09-21-2006 02:51 PM
nospam4me@nospam.com
Honda Mailing List
9
02-22-2004 05:22 PM
Eugene Galchenko
Honda Mailing List
0
01-06-2004 12:19 AM
Currently Active Users Viewing This Thread: 1 (0 members and 1 guests)


